Monday, April 18, 2011

Historicity Colaccio Beccadelli, 1330


I have been busy completing a few displays items for the upcoming MFCA show, mostly older commissions that I owe people. This bust is simply for me and is a piece that is near to my heart as it is sculpted by one of my oldest friends in the hobby and someone who contributed greatly to the old Fort Duquesne line with his work. Augie Rodriguez did a series of busts in his own line entitled "Historicity" that I was fortunate enough to receive the 2nd castings of during their release. I have had three of them in various states of completion for ten years now and recently I started back in on two of them.

When I was doing my hands on demonstration at the local "BuffCon" IPMS Show a week back I wanted something larger to paint on so that people could see what I was doing. Lets face it, 54mm figures can be tough to demonstrate on. I was having so much fun with this one that I decided to keep going. I have lots of work left to do but thought I would share my progress with everyone.

The figure is resin and I know I will get some questions about how I got such realistic metallic work on the bascinet. I use buffable metallizers over a black automotive primer base coat, buffed lightly with a Dremel and the white cotton wheel that comes in the set. I will do a posting on this after MFCA as I have a series of photos showing the technique on an older bust or two.

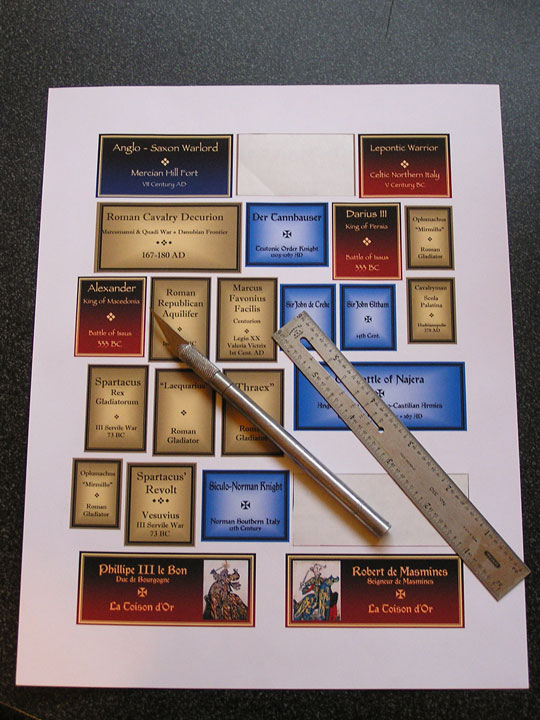
Nameplates Simplified on the Computer


I have been asked a few times recently how I make my nameplates for the figures I complete. It's really very simple and so I thought I would write a brief blog post on my technique. Above you will see a sheet of nameplates that I have created on my computer. These are printed on sticker paper that can be purchased at any office supply store. I buy the whitest version I can find for brilliant color, solid sheet sticker paper so that I can cut the individual labels out with a blade and straight edge.

On my computer I have loaded Window's Office Suite which usually includes "Windows Publisher". I used to use Adobe Pagemaker back in the day to create all of my packaging artwork, labels and instruction sheets so I have a long history of dabbling in the simple aspects of desktop publishing layout. Microsoft's software is pretty easy to work with for simple projects like this, club fliers, instruction sheets, etc.

I begin by measuring the face of the base to determine the size of label I want. I then create a rectangle of color for the label's background. With this software you will learn quickly that there are all kind of effects you can create with the background; fades, transitions from one color to another, etc. Over this I place a rectangular border, usually in black but again, you can get creative with the colors. Simply add a text block in the middle for whatever the figure depicts and link them all together. If you are doing a series of figures you can simply copy the original and modify the type. I also paste in artwork and collect various fonts and wingdings to get creative. Search on the web and you will be surprised how much free stuff (fonts, borders, etc.) is out there.

Label sheets aren't inexpensive so as you can see I tend to lay out my labels in advance so that I won't waste any paper. All in all it is pretty simple after you play with the software. This can be done on other software packages as well so play with it.

Monday, April 11, 2011

Pegaso 54mm Guillaume de Vienne Toison d'Or - Completed


At last, the completed photos! I have a few little tweeks planned prior to delivery of this piece at MFCA, but for all practical purposes he is complete. Knight number two is in progress and I will have photos up on that one in a few weeks. All in all this was a fun project, and one that has sparked a widening of interests for me. Expect to see more subjects from this period along with the usual Ancients.

Pegaso 54mm Guillaume de Vienne - Finishing Groundwork

Once happy with the level of paintwork on the lower portions of the horse, I started working on the groundwork. My idea for this figure was the trampled dirt of the tournament ground, churned earth with a bit of wetness. If you've ever looked at horses after running a race (US Triple Crown) you would get a good idea of the effects I was trying to achieve. My groundwork had been simple "worked" epoxy putty with a mid/dark brown acrylic base coat. Over this I applied a thick wash of Burnt Umber.


Once dry I applied progressively lighter coats of Burnt Umber, Yellow Ochre and Titanium White to the surface, sort of a not so dry "dry brush" technique. As I lightened the mix I pulled it across my palette paper giving me a range of oils from light to dark that I was able to use to dirty up the horse. If you look at references you will see that mud/dirt on any object is drier at the top and wetter on the bottom. Therefore lighter in tone at the top and darker on the bottom. I used a soft blending brush to stipple thick oil paint in spots on the horse and tabbard. This not only gives me the color of dirt but if the paint is thick enough, some realistic texture. Sometimes I will let the paint sit overnight or during the day on the palette so that it gets thicker, before applying.


While the horse was drying I began work on the rider's heraldic crest. My progression can be seen below. The colors and process are pretty much self-explanatory.


Next post, Figure Completed!

Tuesday, April 5, 2011

Pegaso's 54mm Guillaume de Vienne - Painting the Rider

So as with the horse I layed down a red acrylic basecoat followed by the same shades of Red listed in the previous post. The face was painted next with heavier shadows and stronger highlights than normal so that the features would be seen through the "basket" (I must admit to not knowing the technical term for this piece on this style of tournament helmet) once attached. A brown base coat was applied to the wooden weapon.


The same process with the eagles was followed on the front, back and sleeves of the jupon. Similarly to the horse's tabbard, blue was applied to the showing undersides of the jupon. Prussian Blue and Titanium White were used for wet on wet shading, with W&N Indigo used for the shadows, Mars Black deep shadows and the worn edging highlights were completed with Indigo and Titanium White to cut the blue and grey it somewhat.


Breeches and belts painted as well.


Rider attached to the horse and top of helm attached to rider (primed for painting). On to the groundwork painting and the stirrups and reins. Just two more eagles to paint.


Monday, April 4, 2011

Pegaso's 54mm Guillaume de Vienne - Painting the Horse

So with the armor started, my next step was the horse. I began with a some colored basecoats on the red and brown bits back when this was started. This was a change of pace for me as there is so much to paint and so little armor plate. I could have more easily masked the plate and that is the direction I will go in future. I painted the exposed horse parts using tones of Burnt Umber mixed with Burnt Sienna with Mars Brown highlights blended wet on wet. This was all repeated a few weeks later with transparent coats of the same colors to add a bit of depth that I find important for horses. The base red began with Cadmium Red Medium and blended highlights of W&N Permanent Red (A tone between light Cad Red's orangey color and Medium Cad Red's deeper hue). More work was done later on the red (see my next post).


The basic shapes of the heraldry were painted on freehand using a mix of Golden Ochre and Yellow Ochre.


Dioxazine Purple was blended wet-on-wet in areas that should be shadowed in the design. Purple is the opposite of yellow on the color wheel and is a perfect shadow tone for yellow and golden tones.


I then went in with the first mix and, adding a touch more Yellow Ochre to the intial color, highlighted a few areas. This was subtle, as once dry, further tonal highlights would be added.


In the following photo you can see the overall appearance of the horse at that stage. If you compare the photos you will see the effect of the second layer of paints on the horse as well as the beginnings of "socks" on the fetlocks. The photos are a bit over-exposed so the red is lacking in some of the shadowy tones apparent in real life. I'm still playing with the camera - one never stops learning.


Once completely dry I began adding highlights and a few details to the "birds". Using a mixture of Yellow Ochre and Cad. Yellow Medium I was able to begin highlighting the wings, torso and trailing feathers.


Adding Titanium White to the mix allowed further work on the feathers.


At this point I recall seeing Golden Eagles in my sleep. Remember I was painting the same design (multiplied by four) on the rider. You can see that along with the birdies I had been working on the saddle, belting and blue underside of the horse tabard. All of that detail and once I start painting the dirt there will be some of that brown covering the beautiful colors!!!


After contemplating the horse for awhile I found areas that needed more work. That is pretty much always the case. The saddle needed some variation in tone. The front piece is cloth covered on the face and so I left it the same color as the tabard. The inner face is pretty much in shadow once the knight is attached so a deep tone of Mars Black and Cad. Red Deep was applied and further shadowed with Mars Black once dry. The back support was red leather covered in my opinion so a thin glaze of Cad. Red Deep was applied to darken the tone and utilize the shadows previously applied. Once dry, the edge bead was painted with gold printer's inks mixed with Burnt Umber. This will later be highlighted with straight gold ink.

Tomorrow's post will focus on the rider. Stay tuned.

Sunday, April 3, 2011

Pegaso's 54mm Guillaume de Vienne - Toison d'Or

I have been working on a pair of Tournament Knights from Pegaso's wonderful set of knights depicting the first members of the Toison d'Or (Order of the Golden Fleece). These are for a friend of mine who has been patiently waiting for a long time to receive them. The goal is to have both for him at the upcoming MFCA show.

Pegaso has made available three kits and three accessory sets that consist of the changing headdress for all 25 of the knights that are pictured in the armoury illustrations as depicted below. Between the three figures you can choose three armament choices in each kit depending on the type of tournament competition you wish to depict (Lance, wooden sword, wooden club - the latter two for the "Melee"). Between these choices there are seemingly limitless choices for depiction.

The Order of the Golden Fleece or "Toison d'Or" was created by the Duke of Burgundy in 1430 to reinstitute the ideas of chivalry that were believed at that time to be in steady decline. For a more detailed history of the order you should go HERE.


As with all of Pegaso's kits, cleanup was a breeze and assembly straightforward. Let's face it, I like to paint figures not assemble them so the better the quality and ease of assembly the happier I am. After I had prepped all of the parts and assembled everything in sub-groups for ease of painting, I started on the figure. Due to the sheer amount of armor I took advantage of the medium and began with my usual progressive washes of color. Beginning with Prussian Blue, followed by Dioxazine Purple and Mars Black, these successive layers of color will bring out the details of the casting and add reflected color that will add to the realism once the figure is completed. After these layers dry I hand primed the face, jupon, belts, breeches etc. prior to painting.

My next post will focus on the painting of the horse.