This bust of Nicolaccio Beccadelli was created by Augie Rodriguez in 2001 as part of his "Historicity" limited edition resin line. I was fortunate at the time to be at the top of the list for artist proofs (all of my kits are #2 - lucky, lucky!!). I recently started working on this bust again after having it sit for years and here are the completed results. This beauty was a joy to paint and my thanks to Augie for all his support and friendship over the years.
My areas of focus have broadened as everyone can see. I have some Romans and Medieval subjects in the pipeline now so stay tuned for more new work.
Hey folks we are just days away from this year's MFCA show in Valley Forge!!
I'm really looking forward to seeing all my old and new friends there. Introduce yourselves so I can put faces with names!
A brief bit of business here. I don't do commissions anymore but I do sell my work. The years of chasing what others wanted took it's toll and now I paint for me and nobody else. That being said, I will have a large display of work (display only - not in competition - I don't chase that car anymore either). I love having a nice case full of pretty figures but if any collector wants something at the show, don't be afraid to ask. Everything is available.
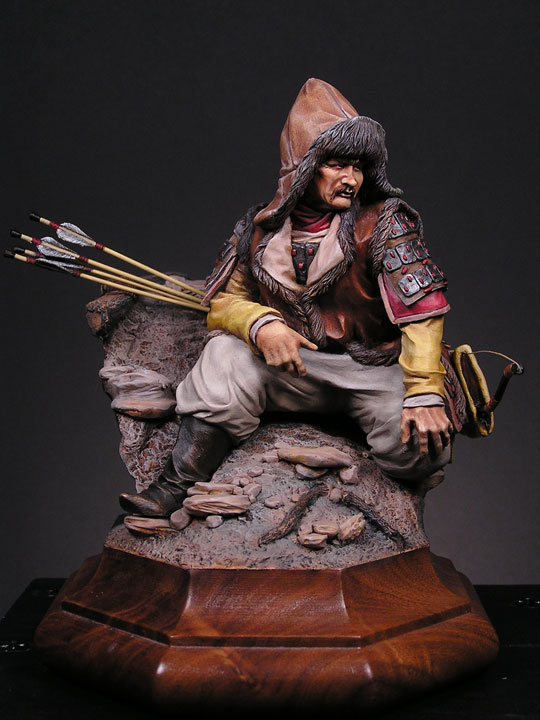
The Mongol is completed. This the first BIG figure I have painted in years (besides busts) and was a little fun diversion. It is one of the pieces I owe Chuck Robinson and will be delivered on Friday at MFCA. The kit was nice and had a lot of personality. It did however have a few issues. As mentioned previously I had to sculpt the laces on the shoulder armor plates and some of the attachment points for the bow case and quiver didn't really make any sense. That is because there were NO attachment points. Knowing your Mongols would help if you are doing this figure. I note that it is no longer listed as available on their web-site so some of you may have this in your "grey army" stash.
This is the last thing that will be done before MFCA. This is a piece that is for Chuck Robinson and is WAY overdue. I hope he likes it.
The kit is an old Bonaparte's kit and after looking at their website it seems to no longer be available. I think it is a beautiful kit. The groundwork was part of the kit so it is a simple piece to paint. I have more detail work to do on the figure (fur, belts, armor, etc.) and am in the process of painting the bowcase, sword and arrow quiver. For some reason their are no laces on the armor and I will be adding those with a thickened paint technique. I will post some pics once it is done.
Enjoy!
OK, First off let's get one thing clear here. The title says "Flatter Oils" not Flat or dead matte or anything like that.
I get a LOT of questions about how I get a matte finish on my miniatures. Everyone knows that oils tend to dry with a sheen, some colors glossier than others. I am fortunate to have learned over the years how to minimize this issue. I will share a few thoughts on the subject here. These are only my personal findings so they may be total quackery - try them for yourself and see what works for you.
First let me say that I hate dead flat miniatures. I know I am in the minority here but oils are designed as a medium that has a certain life to it. Go to a museum and compare a oil painting on the wall that is open to the air with a painting that is under glass and you will instantly see what I mean. I don't try to get dead matte finishes but I try not to have glossy sheen on them either.
The first technique I tried was to put my oils on 3 X 5 note cards to absorb some of the oils. This is fine but limits the working life of the oils (IMO). As my techniques have changed this idea has become unworkable. For years I put my figures in an open crock pot to help pull the oils out but that has gotten old as well and I just don't have the space anymore. In an emergency I will apply a thin coat of Testor's Matt Lacquer from the bottle but I hate doing it as it harkens back to my earlier comment about paintings under glass, something gets lost.
What does seem to work for me is in the photo above. I have been using this brand of brush cleaner for years as a thinner for my glazes and washes. I have seen that it's use over the colors that do dry with a sheen (Blue, green, some browns) will take away the sheen as I apply my highlights and shadows. In addition, it's use in small amounts mixed with my initial mid-tone color also helps. I don't know what it does, but it does something. Other thinners have actually made the colors dry glossier.
This product can be found at A.C. Moore and sometimes at Michael's. In the old days I used to buy it at Pearl Paints but I haven't shopped there in 15 years so I have no idea if they carry it anymore. I hope this tip helps a few people out there.
I have been busy completing a few displays items for the upcoming MFCA show, mostly older commissions that I owe people. This bust is simply for me and is a piece that is near to my heart as it is sculpted by one of my oldest friends in the hobby and someone who contributed greatly to the old Fort Duquesne line with his work. Augie Rodriguez did a series of busts in his own line entitled "Historicity" that I was fortunate enough to receive the 2nd castings of during their release. I have had three of them in various states of completion for ten years now and recently I started back in on two of them.
When I was doing my hands on demonstration at the local "BuffCon" IPMS Show a week back I wanted something larger to paint on so that people could see what I was doing. Lets face it, 54mm figures can be tough to demonstrate on. I was having so much fun with this one that I decided to keep going. I have lots of work left to do but thought I would share my progress with everyone.
The figure is resin and I know I will get some questions about how I got such realistic metallic work on the bascinet. I use buffable metallizers over a black automotive primer base coat, buffed lightly with a Dremel and the white cotton wheel that comes in the set. I will do a posting on this after MFCA as I have a series of photos showing the technique on an older bust or two.
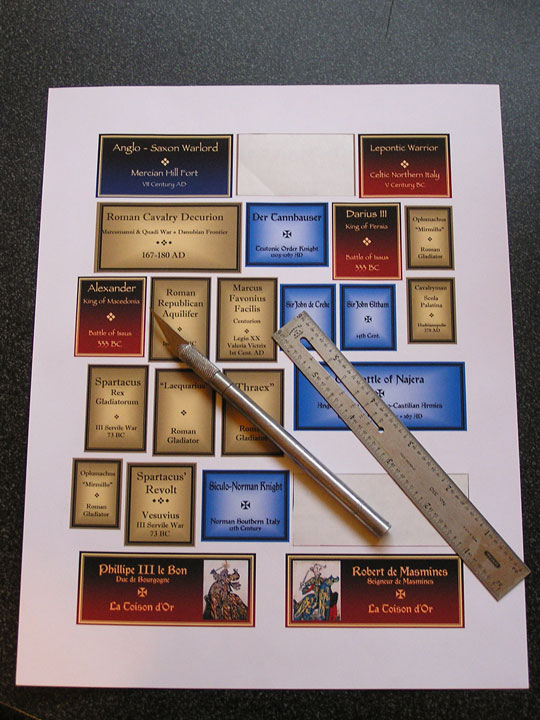
I have been asked a few times recently how I make my nameplates for the figures I complete. It's really very simple and so I thought I would write a brief blog post on my technique. Above you will see a sheet of nameplates that I have created on my computer. These are printed on sticker paper that can be purchased at any office supply store. I buy the whitest version I can find for brilliant color, solid sheet sticker paper so that I can cut the individual labels out with a blade and straight edge.
On my computer I have loaded Window's Office Suite which usually includes "Windows Publisher". I used to use Adobe Pagemaker back in the day to create all of my packaging artwork, labels and instruction sheets so I have a long history of dabbling in the simple aspects of desktop publishing layout. Microsoft's software is pretty easy to work with for simple projects like this, club fliers, instruction sheets, etc.
I begin by measuring the face of the base to determine the size of label I want. I then create a rectangle of color for the label's background. With this software you will learn quickly that there are all kind of effects you can create with the background; fades, transitions from one color to another, etc. Over this I place a rectangular border, usually in black but again, you can get creative with the colors. Simply add a text block in the middle for whatever the figure depicts and link them all together. If you are doing a series of figures you can simply copy the original and modify the type. I also paste in artwork and collect various fonts and wingdings to get creative. Search on the web and you will be surprised how much free stuff (fonts, borders, etc.) is out there.
Label sheets aren't inexpensive so as you can see I tend to lay out my labels in advance so that I won't waste any paper. All in all it is pretty simple after you play with the software. This can be done on other software packages as well so play with it.