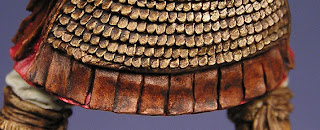
Work continues on the details of these two figures. The following three photos show where they are as of today;
What I have done since the last update is shown below. This is the stage in my work that it seems like a whole lot of time is spent accomplishing nothing but there has been change. My first step was working on the leather edging of the
armor on both figures and the pteruges of the second figure. As I said before,
Mars Brown Base for one and Brown Madder for the latter. Over this I applied
washes of Van Dyke Brown and Mars Black, as well as Burnt Umber and Mars Black,
varying the mix depending on the tonal value of the shadows. This stains the
leather and outlines at the same time. On the pteruges I hit the highlights of
the leather strips with Mars Brown and Mars Orange.
Once dry a few more touches of shadow washes complete the outlining and I began to highlight edges of the strips with Yellow Ochre slightly lightened with White. This was first done thinned in small strokes from the edge inward to create some small "crack" lines and then over the edges, unthinned to give soft wear. The same mix was applied to the ties of the armor suit, shadowed with Mars Black and Van Dyke Brown and highlighted with white. These ties have yet to be given their final highlights. Deep Cadmium Red and Medium Cadmium Red were used on the tunic that shows around the lower edges. This was edge highlighted with a touch of white while still wet to give a faded, worn, pinkish hue.
SR-39 has leg wraps that were painted first using a mix of Van Dyke Brown and White, with shadows of Mars Black and highlighted with White. Once dry a wash of Raw Umber was applied to age the material and final highlights were applied, first with a glaze of white that was blended out wet on dry and given a final edging of pure white.
The sword belts were tackled next. A mix of Van Dyke Brown and Titanium White was applied to both figure's belts, one lighter than the other. The edges were highlighted with white while still wet and blended outward. Once dry a light stippling of browns and black were applied to begin dirtying and aging the belts. This was followed by shadows in a few spots and final edge highlights. This may well be too subtle as it really doesn't show the way I would like in the photos. I will probably work some more on this. I spent a lot of time studying some of the Spaniards and Italians work at MFCA to decide how far I want to carry the shading. Sometimes I feel they go too far in the dark direction but it frequently works when seen in person.


