Showing posts with label gladiator. Show all posts

Friday, November 23, 2012

EVD 60mm Ludus Doctore - Completed

This wonderful little figure is completed now, although I may well dirty up his pants a bit more. I have some subtle yellowing tone shifts around the leg hems but I'm not sure this is enough. Next up from EVD is the "Charon" gladiator grouping. I am also pretty excited about the new grouping from EVD as well, three Romans and an Egyptian "hottie".


Sunday, October 21, 2012

EVD 60mm Ludus Doctore - Update #2

Although I still had some tweaking to do on the flesh, I started work on the rest of the figure as well. The leather jerkin that is worn would have most likely be tanned leather so my color choice here for a base coat was Burnt Sienna with some Orange added. This was stippled to indicate a tiny amount of texture and allowed to dry.
 
 
Afterwards a wash of Burnt Umber was applied to the fur, wrist protection and the jerkin. A wash of Van Dyke Brown with a tiny amount of Mars Black was applied to the shoes. Deep Cadmium Red mixed with Titanium White was applied to the trousers and highlights worked with Titanium White. A little Yellow Ochre was added to the red in the lowest quarter inch or so of the legs to show a dirty color shift. This will be worked later using some crisp over-painting and glazing.


A second wash of Burnt Umber has been applied in the photos below. Additionally I have done a bit more work on the flesh highlights with touches of white. A few shadows have been worked on the jerkin using Burnt Umber.


Another wash, Van Dyke Brown, as well as some deep shadow glazing on the leather jerkin. Further highlighting of the trousers was done using a lighter version of the initial color mix.


Mars Brown was applied to the belting and a mix of Burnt Umber and Mars Black to the fur. The whip was painted with the Umber/Black mixture as well. Mars Black was applied to the blade of the figure's Gladius and wiped off to darken the kit metal to a more realistic color and finish. Raw Umber and Yellow Ochre dots were mixed with Titanium White to get a very light ivory/bone color for the sword hilt. Light dry-brushing of the post using Titanium White with Van Dyke Brown added gives the aged look more realism in the wood, while Yellow Ochre and White were used to make the cuts look more recently exposed to the elements. From this point on it will all be about crisp detailing on the fur, belts leather, edging etc.


Saturday, October 20, 2012

EVD 60mm Ludus Doctore - Update #1

As with all of my figures, everything begins with the flesh and this figure is no exception. It has been 15 years since the last time I had to paint African flesh tones so a bit of a refresher was required before starting. In those fifteen years my painting style and technique have changed as well so this has been quite a new and challenging project to this point.
 
I began with a basic mix of Burnt Sienna, Burnt Umber, a bit of Yellow Ochre and Prussian Blue added to darken the mix and cool the tones a bit. This was applied overall and the excess removed with a soft brush. Prussian Blue and Burnt Umber were mixed and applied to shadow areas and blended. Titanium White with a bit of Yellow Ochre added was used to start lifting the highlights. This produced the initial work that you see in the next two photos.


Once dry, further shadows were worked with a mixture of Burnt Umber and Prussian Blue used as a thin glaze. Layering thin glazes tend to begin to dull the finish as they dry. This contributes greatly to a more realistic finish for flesh with the use of oils. Not to flat and not to shiny, just right. Again after drying, further highlights were picked up using Titanium White glazes.


A touch of Alizarin Crimson and Burnt Umber in the lips and a few hot spots of white on the lips, nose, chin and neck muscles set the final tones.
 
 
Additional work was done on the post with light washes of Burnt Sienna, Burnt Umber, Van Dyke Brown, Mars Black (in that order) to draw out the graining of the wood and aging the post. Additionally some initial tonal work was done on the figure's shoes and the sand.

Tuesday, September 18, 2012

Ludus Doctore 60mm EVD

Every now and then a figure comes along that causes me to "re-order" the priorities on my workbench. Such is the case with the new releases in the ROMA series from EVD. Billed as 54mm these minis are really more along the line of 60mm plus. Depicting various figures from the Roman Gladiatorial Arena, these minis are quite naturally right up my alley.
 
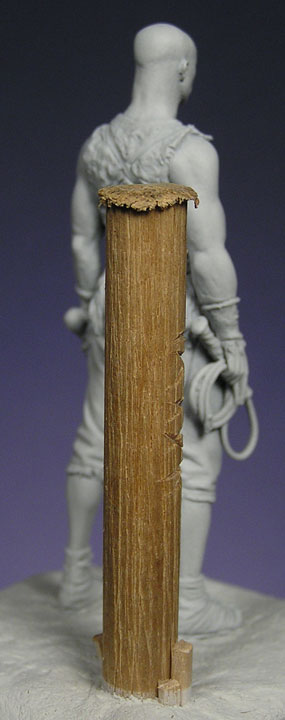
After having released a series of figures in resin that will be the subject of future projects for me, a new release in white metal has hit the market and it was one that I wanted to do right away. Depicting a "Doctore" or trainer of the gladiatorial "Ludus" or school, our figure is an African subject holding the expected whip and gladius. He is wearing trousers with a bit of fur around the lower torso, as well as a form fitting leather upper torso garment. The figure is in a simple yet powerful and dominant pose. For this piece I wanted a symbolic but simple groundwork depiction, so I chose to depict the school's "palus" or training post.


Depicted below is a model of a "Ludus Magnus" from Rome as depicted in the Museo Nazionale Della Civilta Romana, one of the larger Roman Gladiatorial Schools.
 
 
The pole was fairly simple to create. I began with a simple pine dowel which was weathered by first drawing a razor saw's teeth across the dowel lengthwise. Then a hammer was used to mash one end to appear as if the pole had been driven into the ground. The dowel was glued in a hole that had been drilled in the base and wooden toothpicks were shaved to make stakes that would be used to help straighten the post in the school's training arena.
 
Epoxy putty was used to create the soft sandy groundwork and a stiff bristle oil painting brush was used to gently texture the surface prior to curing. The figure was pinned as usual using brass rod, for a strong attachment to the base. The whole base and post were masked and the figure primed as usual with white automotive primer.
 

Sunday, November 14, 2010

Two completed Projects - Clearing Space For New Projects

It's always nice to get done with a project, especially one that has been on the bench for what seems an eternity. I managed to get two things completed and in the case while starting two more projects.

The first item is the Gladiator vignette that has been "in progress" for years. This really was done a few months ago but just sat there waiting for a few small detail touches and the addition of the sword blade on the Retiarius. I finally took the time to get it done after realizing I needed the space for my new projects. The second was the completion of King David from Art Girona's "Historical" line.


Both pieces were very nice projects that have allowed me to test some new techniques for metallic finishes, controlling the sheen of oil paints as well as creating nameplates using Microsoft Office Publisher. I am now printing these onto bright white sticker sheets and applying them to the completed base. I'm pretty happy with how they have turned out.

Saturday, March 27, 2010

Roman Gladiator Vignette Part 7


I know some of you may wonder what has happened to older unfinished projects that have seemingly disappeared from view on the pages of this blog. Have no fear I am still pushing forward on everything and you will no doubt see further postings this week for this gladiator vignette as well as the Mayan priest bust and a new series on a bust I am painting from Michael Miniatures. The weather has been lousy this week between rain and the return of the cold air.
I did get the padded left arm of this figure started and attached last weekend. I had held off on this until I felt the torso was at a point that wouldn't require my getting a paintbrush into certain areas. The figure is slowing coming along and I hope to get more done this weekend.

Thursday, February 4, 2010

Roman Gladiator Vignette Part 6


Further progress on our gladiator vignette as I am now starting again on the second figure in the grouping. The first figure is darn near complete with more work being necessary on all the metallic bits. My greater focus will be on the flesh, leather and cloth of the Retarius. Stay tuned for more.

Monday, January 25, 2010

Roman Gladiator Vignette Part 5


Work continues on my gladiator vignette. Although I have been focusing on this half of the grouping I will soon begin anew on the Retiarius figure as well. I have been focusing on the metal bits and am about half way through. The cloth and belting is almost complete with only the belts on the padded shin armor to paint. Once the right arm is complete I will be able to paint all the ruffles of cloth padding seen around the separate scales. I am also working on the shield design as well. Stay tuned for future posts.

Monday, June 15, 2009

Something New - Pegaso 54mm Gladiator "Scissors"

So here is my first new figure in ages. I must admit to having started this piece about 6 years ago and then it got put away. Once I started painting again I decided to finish it at the same time that I started the other figure you will see in my next post. What was really new for me was my decision to paint all of the metallic bits using a non-metallic painting process. I had previously attempted this on my Caesar vignette (More on that later) with some limited success. I wanted to create some well worn Bronze armor for this figure and so I started with a Raw Umber and Mars Black mix for the base coat, and more Mars Black in the form of a glaze followed by a wash to add further depth to the shadows. Successively lighter glazes of Yellow Ochre mixed with Mars Black through pure Yel. Och. to Yel. Och with Tit. White for final highlights, brought the color and effect to what you see now. The mail is various gray shades up to pure white. Am I happy? - Yes absolutely. Am I satisfied? - No Never!