Showing posts with label Medieval. Show all posts

Thursday, October 10, 2013

Pegaso Knight Templar Bust - Completed

 
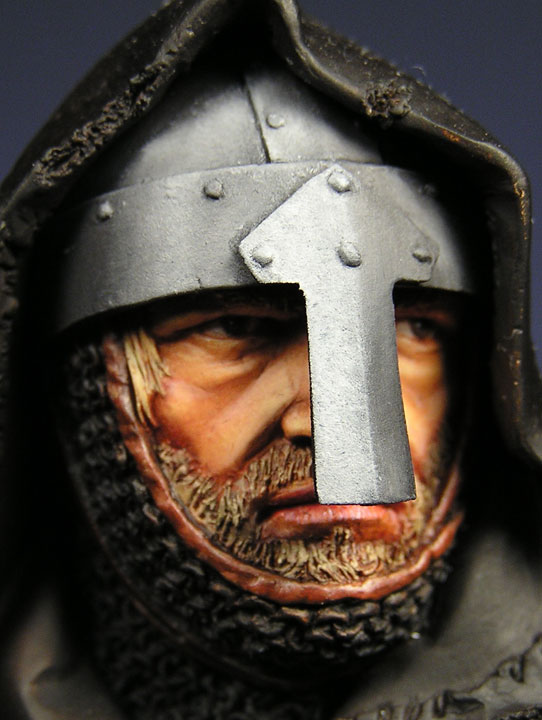
All Done!! So first let's get the name change out of the way. Up to this point the bust was going to be a Hospitaller but in the end he has become a Templar. Fairly straightforward. All the details are completed with the addition of the rope and the helmet strap tail. A bit of touch-up here and there and we are complete. Enjoy!
 
I have to say the challenges with this project were the armor (no metallic paints involved) and the cloak (achieving a worn, faded black).


Friday, October 4, 2013

Pegaso Knight Hospitaller Bust - Update #3

 
Work proceeds on this bust with the end in sight. I have completed the armor, not a bit of metallic paint to be found on this bust. The leather belt is complete as is the hooded cape. This was a bit of fun as I wanted a faded black cloth with desert dust on it. It started with a brown-black base color over which I added lighter browns and tans to achieve the desired effect. I have begun painting the shield face and have been able to attach that item as shown. All that remains are a few details as well as the rope holding the cape and a bit of trailing strapping on the helmet.


Wednesday, July 31, 2013

Pegaso Knight Hospitaller Bust - Update #2


My focus on this bust has been painting the helmet armor.  The kit is obviously resin so I had a few choices for how I wanted to tackle the metal bits. The first choice and least liked for this project was simply working with printer's inks and oil paints. Due to the scale and the large smooth surface I felt that I would never be able to achieve the effect that was desired. Second choice was the use of buffed metalizers which I have used before. This choice would have required my getting the cotton buffing wheel into areas that are partially hidden by the hood, again a poor choice. My last choice and in the end, most challenging artistically was to simply paint the metallic effect in layers of white and black, followed by hints of reflected color.


I started with a Mars Black base, allowed to dry.


To this I began applying various shades of grey, blended out to reflect the curved surface of the helm. Each layer was allowed to dry before going on to the next.


The final highlights are applied with pure Titanium White. This same technique will now be applied to the mail. You can also see a basecoat of Burnt Umber with Mars Black has been applied to the cloak and hood to begin the sun-faded black cloak of our Crusader.


Monday, July 1, 2013

Pegaso Knight Hospitaller Bust - Update #1

As if I don't have enough irons in the fire I started a few other additional busts as well as Ludendorff so that I would pieces at various stages for my last painting class. This means I have way too many things on my workbench but I also have a lot to keep me busy and complete. All in all a mix of good and bad I guess.
 
The stages are self explanatory I guess, at least as far as the face goes:


The face was painted separately and then placed inside the hood once I got far enough along. The hood would have inhibited my brush work and the assembly is clean and easy.
 
The hood is black but cloth dyed as such would fade brown so I am working the basic undertones with mixtures of Burnt Umber and Mars Black to get the warm tones that I will eventually weather. I needed to paint the inside of the hood and the back of the bust where the shield attaches first so that assembly can continue.


The tunic is Titanium White and Raw Umber mixed and blended wet-on-wet for my initial tones.  

The next two photos show where the bust is at this point. I have yet to complete final highlights of the face but I wanted it in the hood so that I could better visualize the effects of light on the face when hooded prior to continuing.


The shield needs to be started prior to attaching to the back of the bust. I wanted a nice worn, dirty aged look to the wood, yet out of focus. This can be seen below.


Thursday, May 2, 2013

54mm Gunther von Schwarzburg - Completed


At last our little friend is completed. This was a long project but one that was very educational. In the end I learned a number of new techniques, experimented with color and I am happy with the final results. Enjoy!

Sunday, April 28, 2013

Soldiers Gunther von Schwarzburg - Update #8

A bit of honesty here.....I love medieval subjects, but I HATE painting heraldry, especially the more detailed it becomes. This figure has a ton of lions, equally spaced all over the blue surcoat. I started painting them by using a mixture of Yellow Ochre and Cadmium Yellow Deep. This mixture is very transparent as can be seen in the photos, but makes a nice base outline for the heraldry. Not shown below is my progress today on these lions. The larger one on the shield is of a size that I can outline and delineate the lion with black oils. Fine lines from a very small brush!
 
These photos show the fence and shield on the base temporarily to see how everything is coming along. I am still painting the two items separately until the heraldry is complete.


Saturday, April 20, 2013

Soldiers Gunther von Schwarzburg - Update #7

Progress is very slow considering the amount of time I have spent working on the metal details. Getting everything fine tuned is a long process and there is still quite a ways to go here. I would love to have this one done for MFCA - who knows, maybe.


I have started on the sword, legs and belt as seen here. My technique makes me go dark to light, dark wash, light highlights. This is very aggravating at times as I constantly have to think about reflected light, reflected color, shadows and hot spots.

 
I am happy with my progress on the sword.


Thursday, March 28, 2013

Soldiers Gunther von Schwarzburg - Update 6

I think it has been three months short of a year since the last time I posted progress on this miniature. In my desire to clear old projects off of my bench I decided to start working on this figure again at the same time I am working on the Roman bust. In a few hours time this past Saturday I was able to get the right and left arms started as well as some work on the basic colors for the helm's decorative cloth components.
 
As explained before, my goal is to complete the entire figure without using any metallic paints. To that end I have been using Yellow Ochre, Raw Umber, Mars Black and White in various mixes to create the colors necessary to replicate the gold tones of Schwarzburg's armor. Everything seen on the gauntlets and elbow protection (or Cowter). Once dry, crisper highlights and shadows will be applied.


I also painted the base color for the back of the shield. This will be hanging by the strap from the section of fence that will be slightly behind and to the right of the figure. A coat of blue matching that of the figure was painted on the face of the shield in preparation for the beginning stages of heraldry. Stay tuned for more updates. I guarantee that they will come sooner than this one as my enthusiasm has really returned for this little project.